How to setup a Wiki site using MediaWiki: a tutorial for dummies (like me)
EDIT (29/06/2026:) This was originally published many years ago in my own personal domain, back when I had a wiki site of my own. That wiki is now defunct but I thought I'd keep this tutorial here in case anyone needs it.
I've decided to write this because the process of setting up a wiki as a complete beginner was quite frustrating. So if you're in the same boat as me, I hope this guide can shed some light on the process!
If you have some information I might have skimmed over, or if there's anything you'd like to ask me, you can get in touch by either using one of the socials linked on my homepage or send me an e-mail: hellastars.art[at]gmail.com.
Navigation:
Things you will need ♦ Setting up your website ♦ Uploading the MediaWiki files to your host ♦ Setting up a MySQL database
Installing your wiki ♦ Extra configurations ♦ Installing Scribunto
Things to consider
Before you go further in this guide however, there are some things you should consider. I host my wiki on my own domain, because I like the freedom and control it gives me over my project. However, there are alternatives, such as hosting your wiki on a wikifarm.
Wikifarms are usually free and more limited, so this really depends on what you want from your wiki. Another positive is that they're easier to set up. Here's a list of the more known wikifarms:
- Fandom (AKA Wikia): Perhaps the most well known wikifarm, Fandom used to be good at some point. Nowadays, it's usually bloated with ads and those weird videos they insist on displaying all over the page. A few fanwikis had moved to Gamepedia because of this, but then eventually its parent company (Curse LLC) got acquired by Fandom as well, which brought its problems with it. Isn't capitalism amazing!
For these reasons, I really don't recommend Fandom. I felt the need to address it here because it's so well known, but if you are considering starting a wiki of your own for free, there are alternatives. - Miraheze: This is not as popular, but Miraheze is the best free alternative for hosting your own wiki. They don't keep ads on their pages, and they are officially recognized as a non-profit.
- Wikidot: I haven't really used Wikidot all that much so I can't really vouch for it. However, Wikidot hosts some pretty popular pages like the SCP Foundation, and it is a pretty powerful wiki hosting service. It is a little harder to set up in my experience, especially if you're trying to get that "wikipedia look." They also have some restrictions on what kind of content can go in the site, especially when it comes to copyrighted content. Their service is completely free, but I believe there is a storage limit for free accounts.
There are also wiki software alternatives to MediaWiki, some of which can be simpler to set up. The downside is that they might not have as many features and resources, but they're worth checking out if you feel like MediaWiki isn't right for you. As a disclaimer, I personally haven't used any of these, so this guide will not cover their specifics.
Things you will need:
- A web host. There are a variety of web hosts out there, but they're usually a paid service. However, they're not all super expensive as it may seem! The one I use is NearlyFreeSpeech.NET, and they have a policy of only charging what you use, which is perfect for hobbyists like me.
There are other hosts out there, or if you're knowledgeable enough you can even set up your own server (and if that's the case, you probably don't even need this guide, do you?)
Static page hosts like Wix, Carrd or Neocities won't work for a complex website such as a wiki. You will need a host that supports PHP and MySQL. - A FTP client, so you can transfer files from your computer to your web server. I personally use FileZilla, but there are many other alternatives out there too.
- PuTTY. This will allow you to input commands into the server. We are gonna use this for more technical things like setting up your database and compiling files later on.
- The MediaWiki files. You can download these directly from MediaWiki's download page. You can get the latest version, but keep in mind that this tutorial was written at the time when version 1.39.9 was the latest version. Because of this, the information in here might be outdated, but you hopefully won't find any big problems.
- A text editor. I personally use Notepad++, which is a text editor built specially for coding. I recommend using this program as we will be editing php files, which I believe cannot be opened by the regular Notepad that came bundled with your computer.
- (Optional) A notebook, or any way to write down things. During the setup process you will be required to keep track of several credentials, and you really shouldn't just use the same password for everything. To minimize security risks, you will be needing long passwords, and you really should write them down somewhere because if you forget them, you might not be able to recover them.
Setting up your website
The first thing you should probably do is get your site up and running. As I mentioned before, I personally use NearlyFreeSpeech.NET as my host, so I'll be writing about my experiences. Different hosts might work differently, so if you have any other questions that are not covered by this guide, you should check in with your host.
To create an account with NearlyFreeSpeech.NET, just follow the instructions on their website. When creating a site though, here's a few pointers:
- - Your site will need to be a production site, since you'll be using it to host a wiki. You will also have the option to select a subscription membership, in the case that your site is critical (aka, if your site is vital for your business.) However, if you're like me and just want to keep your wiki as a hobby, a production site should work just fine.
- - You will be asked to enter a canonical URL for your site, and an alias. The canonical URL is your site's "true" name, while the alias is just something that will redirect people to your site if they type it in their browser. For example, my site's canonical URL is "www.crimsonhaven.com" but if you just type in "crimsonhaven.com" it will also redirect you to my site. This is because "crimsonhaven.com" is my site's alias.
- - You can also purchase a domain, if you want your site's canonical URL and aliases to work. You can buy one from NFSN itself, or buy it from some other domain registar. They will set you up with a free domain though ("www.yoursite.nfshost.com") so you don't have to worry about buying one if you don't want to.
- Should you get a .com, .net or a .org? It doesn't really matter to be honest, the biggest difference is price and availability. .com domains are more popular, so getting a generic domain like "cutekitties.com" is a lot harder than "cutekitties.org," since there are more people using .com than .org. But if your site is like mine, in which the name is a little less generic, this shouldn't matter.
NearlyFreeSpeech will walk you through the registration process, and if you have any questions I highly recommend checking out their member FAQ. It's a bit of a read, but worth taking a look at if it means getting your site running smoothly.
After you finish setting up, you can visit your website.
!!! Possible Error !!! If you access your site now, you may get a 403 Forbidden error. This happens because you haven't uploaded anything to your site yet!
And if your browser is completely unable to connect to your site, it may be because the domain is not set up correctly. The domain can take a while to go online once you create your site, so you may need to wait an hour or so before trying to access your site.
So that's the website setup done! Now you should be ready to move on to uploading your wiki files to the server and... there's one more thing. This next step is optional, but I feel like it's worth mentioning it.
If you did setup your own domain, you'll probably notice that it has a HTTP url, as opposed to a HTTPS. The HTTPS (aka TLS) basically adds an extra level of security to your data by encrypting it. Most websites have HTTPS nowadays, and it's signified by the little lock icon next to the site's URL on your browser.
Getting a TLS certificate nowadays is very easy and free, so there's really no downside to it. Plus, if you are going to maintain a wiki, then it's recommended you get one for extra security. The easiest way to get a TLS certificate is through Let's Encrypt, and I will provide instructions on how to do that below.
First, open up PuTTY. You will be greeted with a few options, but the only one that interests us if the field "Host Name (or IP address)". Your host's SSH hostname will likely be provided to you, and in NearlyFreeSpeech's case all the credentials you need will be in a box labeled "SSH/SFTP Information" on your control panel.
Leave the port as 22, and make sure that the connection type is SSH. Then click on "Open". PuTTY will open a black window, and will prompt you for your username. This will also be listed on the SSH/SFTP Information zone. Type your username and press Enter on your keyboard.
You will also need to type your password, and for security reasons whatever you are typing will not show up on the window. This is normal. Press Enter again and you will login. Once that's done, type tls-setup.sh and press Enter. The Let's Encrypt TLS will begin installation. You will have to agree to the Terms and Conditions when prompted.
Now you should have your HTTPS url, and we can move on to the next step!
Uploading the MediaWiki files to your host
The first thing you'll need to do for this step is to open up FileZilla, or whatever FTP client of your choice. Connecting to your server via the FTP client is similar than what you did for PuTTY:
- - The field Host is your hostname, the same one that you had to input for PuTTY. Your host might be using an SFTP instead of FTP, and in that case you'll need to type sftp:// in front of the hostname. (Example: sftp://hostname)
- - The field Username is the same username you used to log in the server with PuTTY.
- - The field Password is the same password you used for PuTTY.
- - The field Port doesn't really need to be filled, I've never put anything in there and it always works. But in case you need it, the port is usually 22.
You can now connect to the server. FileZilla will then show you the files that are currently on your server, and if you are using NearlyFreeSpeech then it will look like this:
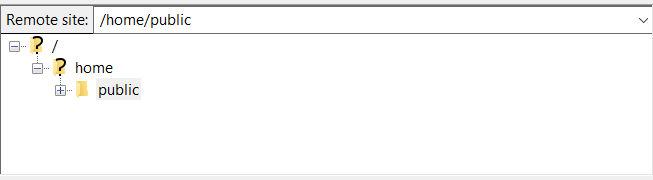
"public" is your root directory. This means that everything your upload to your host will be inside the "public" folder. Try uploading a simple HTML document named "index.html" to it, and then access your site. You can do this by simply dragging a file from your computer to the folder. Whatever you wrote on your document should show up in your frontpage!
!! Note !! If you have gotten your TLS certificate through the Let's Encrypt method, then there might be a folder called ".well-known" already uploaded in the /public directory. This is what your site is using to encrypt your data, so don't worry about it and just leave it doing its thing.
Before you upload your MediaWiki files though, there are two things you should know:
- 1. MediaWiki does not recommend uploading the files directly into the root directory. You can read more about it on this page. My wiki has a directory just for it, and even Wikipedia keeps its wiki in it's own directory. (Try visiting wikipedia.org, and note how it's just a landing page of sorts. The actual wiki pages are in wikipedia.org/wiki)
- 2. There are a lot of files to upload. About 25k files. They are pretty light and amount to just over 250 MB, but that's still an extremely large amount of files to be uploading at once.
So with that in mind, the easiest way to do this is by uploading the .zip archive directly to the root, and then extracting it in the FTP client itself. This should be faster than just uploading every file normally (doing it like that takes about 5 hours. Trust me.) After you finish extracting the files, just rename the directory into whatever you want.
The directory structure should look like this: /home/public/yourwiki.
Ok so now that your files are in the server, you will need to set up some permissions. Find the file "index.php" on your wiki's directory, right click on it and choose the option "File Permissions". Type 644 on the field and press ok. (I'm not actually sure if that's 100% necessary in the newer versions of MediaWiki, but better to be safe than sorry right?)
Now do the same with the /images directory, but this time set it to 775. This will allow you to upload images on the wiki. But we also need to change the group, so open up PuTTY again (here's the instructions in case you skipped it). Type in the following command:
chgrp web your-wiki/images
This should change the directory's group to web, and you can check it via FileZilla.
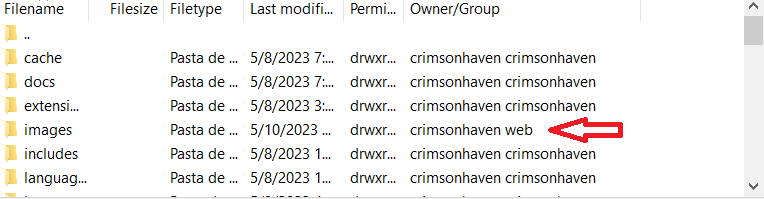
And that should cover everything you need to do for this step.
Setting up a MySQL database
Here's where things get a little bit more technical, but it's nothing you can't handle I'm sure. The first thing you will need to do is start a MySQL process.
Check if your host has the option to create a MySQL process for you. With NearlyFreeSpeech, this option will be available under the "MySQL" tab in your control panel. Just select the option "Create a new MySQL process" in the sidebar menu, and you will be taken to the creation page.
MySQL process usually cost money to maintain, but they're dirt cheap so you shouldn't have to worry about it too much. The options you will have are between the older and newer versions of MariaDB + InnoDB, and I would personally choose the newer version.
Once your process has been created, your host will hopefully give you a password so you can access it (NFSN sends it to you via email). This password is temporary and will need to be changed immediately.
To do this you will need to open up PuTTY again. Input the host's SSH hostname in the field, and click on Open. Login with your username and password (as a reminder, the window will not show your password as you are typing, so it may look like it's stuck. But that's how it's supposed to look like.)
Once you have logged in, you will need to access your MySQL process. Your credentials are not the same as the username and password you just used. If you're using NearlyFreeSpeech, then those will be listed on your MySQL control panel in the "How to access MySQL" box.
Type the following command:
mysql --host=hostname --user=username -p
(in some cases, these would be "localhost" and "root", but if you are using a hosting service you'll have to type the credentials given to you.)
You will be prompted for a password, and you must input the one you've received in your email. Press Enter and you'll be greeted by the MariaDB interface. Here's a list with the MariaDB commands we'll be using
Now type in the command:
ALTER USER 'username'@'%' IDENTIFIED BY 'your-new-password';
Here's my advice: plese note this password down somewhere. Like I had mentioned earlier in this guide, you'll be having to keep track of a lot of credentials, and if you forget this password you may never be able to get it back.
Now we have to create a new database. You can do this in two ways: First, check if your host has an option to create a database for you. (NearlyFreeSpeech should have that option when you access your MySQL process on the control panel). If you don't have that option, you can create one by the command line. Just type in the command:
CREATE DATABASE database_name;
So hopefully you should have a database by now. You can check on all the databases on your process with the command SHOW DATABASES;
NOTE: there might already be a few databases included on your process, as they are created with the process itself. Don't use those for your wiki, use the one you created just now.
Now for the final step, and a very important one. When you set up your wiki, all your MySQL credentials will be visible in the code, which means that anyone will be able to see it if they have any coding experience. So we'll need to create a User just for your wiki's database. This will ensure that your User's credentials will be visible, but not your Admin's. By ensuring that your Admin credentials are not visible, you'll no longer face that security risk, since it is impossible to access your databases without your Admin password.
To create a new user, type in the following command:
CREATE USER 'new_username' IDENTIFIED BY 'new_user_password';
And please remember to use a different password from your admin password!
So now that you have a new user, we need to grant it privileges on your wiki's database. Do this with the following command:
GRANT ALL ON database_name.* TO 'username';
And there you have it! That is everything regarding the database, so we can proceed with the next step now and finally set up the wiki!
Installing your wiki
Navigate to your wiki's url on your web browser. You will be greeted with a message stating that the wiki has not been set up yet. Click on the link the page gives you, and you will be taken to the installation script.
There isn't much to do, simply follow the instructions given on the install wizard. You can also check this page for more info. But, here are a few pointers:
At some point, the MediaWiki wizard will ask you for your MySQL username and password to it can create the database tables. Remember to input the user you created for your wiki's database, not your MySQL admin user! These credentials will be visible in plain text, which is why you shouldn't use your admin user and password.
During the Options section, you will be asked if you'd like to set up the advanced options. I recommend you do.
I recommend installing the Wiki Editor, since it makes it easier to edit articles. There's also the Visual Editor, although I haven't used that one myself. Also, I should let you know that the Visual Editor would not load for me, presumably because of some Javascript error.
You should also install the following extensions:
- ParserFunctions
- Scribunto
- TemplateStyles
- TemplateData (although I think this one is not available from the install wizard. we will install it later)
- InputBox
- MultimediaViewer
If there's any of these not available in the install page, don't worry because we can install them later.
After your wiki finishes installing, it will give you a file called LocalSettings.php. You will need to upload this file to your wiki's directory on the server. After you do that, you can navigate to your wiki's URL and hopefully it will be ready for you!
Extra configurations
So by now you've probably noticed that you can edit your wiki, but it still doesn't look like a wiki proper. You might want to install Infoboxes or other cool templates.
To import Wikipedia's infoboxes to your wiki, you can simply follow this tutorial. To do so, you'll need to install a few extensions.
There are a few extensions that you probably already installed on the previous step, but if there's any you missed now is the time to install them. You'll only really need the ones I listed on the previous step, but you might need to install more extensions depending on the templates you are using.
To install an extension, you will need to download the files from MediaWiki and then place it in the "extensions" folder on your site. Then, you'll need to edit your LocalSettings.php file. To do so, simply right click the file on your computer, and open it with Notepad++. Then just follow the instructions given on the MediaWiki tutorial for each extension. After you edit the file, just upload it again to your server, making sure to replace the old version.
You should be able to install most extensions this way, but there is one that will work differently, and so we will cover it in its own section: Scribunto.
For now, keep following the Infobox tutorial. Next up is exporting Templates from Wikipedia. If you want to import just the Infobox template, here it is. The tutorial will also recommend you export a bunch of different modules, so go do that. You don't really need all of them; Infobox, Navbar and Navbox are the most important ones. I believe you will also need to export the commons.css template.
Once you are finished exporting all the templates you need, you will get a xml file. Now, we can move on to the "installing scribunto" step. After you have finished installing Scribunto, you can import the xml file to your wiki. To import it, just navigate to your wiki's Special:Import page.
Note: you will be required to fill in the "Interwiki prefix." In this field, you can just write the interwiki prefix of the wiki you are importing from. In wikipedia's case, just write "wikipedia" and you should be fine.
Installing Scribunto
Scribunto is a bit more complicated to install, and that's because it runs on a language called Lua. In order to properly import the Wikipedia templates into your wiki, you will need to get Lua and Scribunto working.
On the tutorial page for Scribunto, you will be told to input a specific code into your LocalSettings.php file:
wfLoadExtension( 'Scribunto' );
$wgScribuntoDefaultEngine = 'luastandalone';
This code might not work for you, as it did not work for me. You see, Scribunto comes bundled with three Lua binaries: one for Windows, one for Mac and one for Linux. Now keep in mind that this is the OS that your server is running on.
In my case, the server that I'm using runs on FreeBSD. Which means that I had to compile a Lua binary myself. In fact, if your server runs on a BSD Operational System, you might be able to get the binaries that I compiled: download them here. (This is a .rar file)
You can just extract the folder and place it on the root directory of your server. However, I'll also tell you how to compile the binaries by yourself, so stick around.
For reference, here is the official Lua manual.
The first thing you'll need to do is download the source file. You can do so from this page. Scribunto only works with version 5.1, so you'll need to scroll down and get version 5.1 specifically.
Once you download the file, extract the folder and place it in your server's root directory. Now that that's done, open PuTTY and log in with your credentials. Navigate to the Lua directory using the command cd:
cd lua-5.1
Now use the make command to build your Lua binary. Make sure to specify the OS. For example, my server is running on BSD, so I'll type in:
make bsd
The platforms supported are listed on the reference manual I linked earlier. Now that you have your binary compiled, go back to your LocalSettings.php file, and type in at the end:
wfLoadExtension( 'Scribunto' );
$wgScribuntoEngineConf['luastandalone']['luaPath'] = '/path-to-folder/lua-5.1/src/lua';
Make sure to specify the path to the Lua folder correctly. You can place the folder wherever you want really, I recommend keeping it somewhere easy to keep track of. I keep mine in the root directory. The binary will usually be in the 'src' folder.
Upload the new LocalSettings.php file to your wiki's directory, and that should have correctly installed Scribunto on your wiki. Now you can go back to importing the Templates!